Home Automation Demo Tips & Tricks
Demo revision
Make sure that you have the latest demo revision: be sure to run Demo version 4.2 onwards. Compared to demo shipped with the first batch of Atmel Evaluation Kits, an improved demo is available from this very website: Home Automation Demo: latest revisionTouchscreen feeling
For Demo running on a resistive touchscreen, make sure that you use a sharp object such as a pen or stylus. In fact, it is the pressure on the touchscreen film that gives the location information to the SoC ADC controller. So, remember, a resistive touchscreen is manipulated differently than a capacitive one.Screen transition & temperature sensitivity values
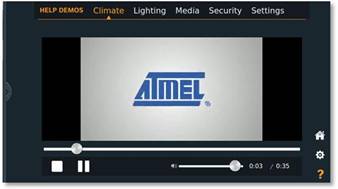
Home automation screen transitions
When switching between screens (climate to lighting for instance), transitions might seem a little bit slow. This is actually an effect, a transition animation that is controlled by a timing (new screen is sliding from right to left).The default setting is 300ms for the transitions, done twice. If you have the feeling that screen transitions and widgets within the home automation demo are too long, you can modify these timings.
|
|
Temperature widget sensitivity
Temperature widget also comes with user configurable sensitivity. Default setting for this sensitivity is 2.

|
Changing configurable values
- Screen transition & temperature sensitivity are command line arguments of
HomeAutomationapplication - Screen transition & temperature sensitivity can be changed when you launch the application
HomeAutomation application from the command line: - connect the USB-CDC (
J14) serial console to your computer - open a terminal with the usual configuration:
115200, 8bit, no parity, 1 stop bit, no hw flow control - login as
rootwithout password
HomeAutomation command line syntax is:
# /opt/HomeAutomation -transitions=<value> -sensitivity=<value>To get an instantaneous screen transition you have just to set transition to zero:
# /opt/HomeAutomation -transitions=0 -sensitivity=2
Modify Application Launcher
You can also modify theApplication Launcher to start HomeAutomation with your preferred values:HomeAutomation is run by shell script /opt/HomeAutomation/resources/HomeAutomation.sh
To modify default values you have just to edit this file with the vi editor that is available in the embedded Linux environment:
# vi /opt/HomeAutomation/resources/HomeAutomation.shModify it to add the command line parameters according to your needs:
!/bin/sh
cd "$(dirname "$0")/.."
./HomeAutomation -transitions=0 -sensitivity=2
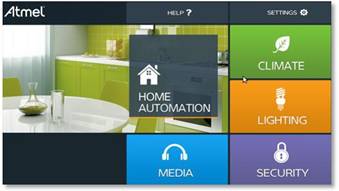
How to Customize the Application Launcher
TheHome Automation main menu is managed by the Application Launcher. You can easily customize this graphical menu by simply editing XML files. Background, number of applications presented, application icons and applications started can be modified using a text editor without re-compiling anything.
The Application Launcher is located under the /opt/ApplicationLauncher/ folder:
bin
qml
resources
The
bin directory contains the main QT application which is called ApplicationLauncher. This application is launched by its associated script ApplicationLauncher.sh.When starting the board, This shell script is automatically launched at the system startup by the dedicated init script named
/etc/init.d/qtdemo that follows the classical SystemV init procedure.
Here are some entry points to customize some aspects of the Application Launcher:- demo background image update
The background image is managed by thePage.qmlfile located under/opt/ApplicationLauncher/qml/ApplicationLauncherfolder.
Image { anchors.fill: parent smooth: false source: "../../resources/background.jpg" clip: true } - demo main menu update
You can add another application to the screen by editing theapplications_list.xmlfile located under/opt/ApplicationLauncher/resourcesfolder.
Adding another<entry>in the .xml file adds a new application button. - link an application to a graphical button
Theapplications_list.xmlfile located under/opt/ApplicationLauncher/resourcesfolder can be modified to change<title>,<link>and<path>properties. These modifications allow you to run the desired application, by clicking a different button image.
ApplicationLauncher after any change:
# /etc/init.d/qtdemo stop
# /etc/init.d/qtdemo start
Here is an
<entry> of the applications_list.xml file:
<entry>
    <title>Home Automation</title>
    <link rel="alternate" type="text/html" href="../../resources/applications/resources/home-automation.png"/>
    <id>tag:atmel.com,2005:/app/8144940683</id>
    <published>2012-11-01T15:45:05Z</published>
    <updated>2012-11-01T15:45:05Z</updated>
    <author>Unknown</author>
    <path exec="/opt/HomeAutomation/resources/HomeAutomation.sh" />
    <arg></arg>
    <description>Test Description</description>
    <link rel="enclosure" type="image/png" href="../../resources/applications/resources/home-automation.png" />
</entry>


|
||||||||||||||||||||||||||||||||||||
r3 - 21 May 2015 - 13:44:11 - NicolasFerre
Linux4SAM
Open source solutions ApplicationsBoards
- SAMA7D65 Curiosity
- SAM9X75 Curiosity
- SAMA5D29 Curiosity
- SAM9X60 Curiosity
- SAMA7G5-EK
- SAMA5D2-ICP
- SAMA5D27 WLSOM1 EK
- SAM9X60-EK
- SAMA5D27 SOM1 EK
- SAMA5D2 PTC EK
- SAMA5D2 Xplained
- SAMA5D3 Xplained
- SAMA5D4 Xplained
- Older boards
FAQ
Useful links
- Microchip Microprocessors forums
- AT91 Community (archive)
- Microchip
- Linux4Microchip on GitHub
- Linux4SAM on GitHub
NAVIGATION
Copyright © by the contributing authors. All material on this collaboration platform is the property of the contributing authors.
Linux® is the registered trademark of Linus Torvalds in the U.S. and other countries.
Microchip® and others, are registered trademarks or trademarks of Microchip Technology Inc. and its subsidiaries. ![]()
Arm® and others are registered trademarks or trademarks of Arm Limited (or its affiliates). Other terms and product names may be trademarks of others.
Ideas, requests, contributions ? Connect to LinksToCommunities page.