SAMA7D65 Curiosity
SoC Features
The SAMA7D65 MPU is a high-performance ARM Cortex-A7 CPU-based embedded MPU running up to 1GHz.
The board allows evaluation of powerful peripherals for connectivity, audio and user interface applications, including MIPI-DSI and LVDS w/ 2D graphics, dual Gigabit Ethernet w/ TSN and CAN-FD.
The MPUs offer advanced security functions, like tamper detection, secure boot, secure key stoarge, TRNG, PUF as well as higher-performance crypto accelerators for AES and SHA.
Kit Information
The SAMA7D65-Curiosity documents can be found on microchip website, as following:
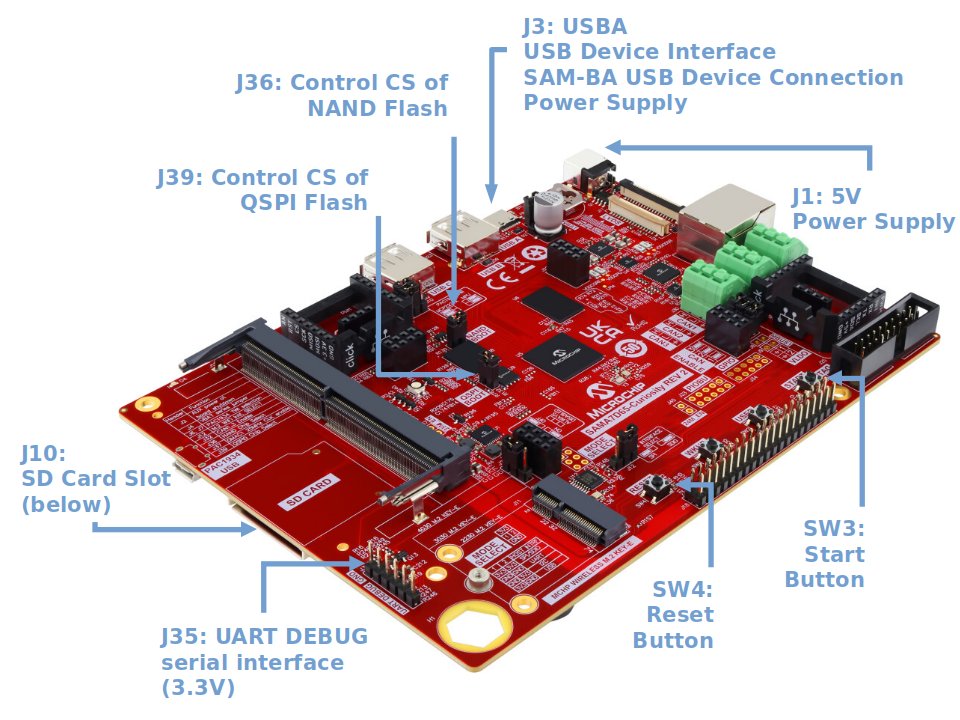
Kit Overview
The usual serial communication parameters are
115200 8-N-1 :
|
|
| Baud rate |
115200 |
| Data |
8 bits |
| Parity |
None |
| Stop |
1 bit |
| Flow control |
None |
|
|
|
The serial console can be accessed from the DEBUG port with the help of a TTL-to-USB serial cable (marked as DEBUG J35).

Using DEBUG on TTL-to-USB connector (DEBUG J35)
- For Microsoft Windows users: Install the driver of your USB TTL serial cable.
- Be sure to connect a 3.3V compatible cable and identify its GND pin. Place it properly according to the silkscreen and connect the cable to the board (J35)
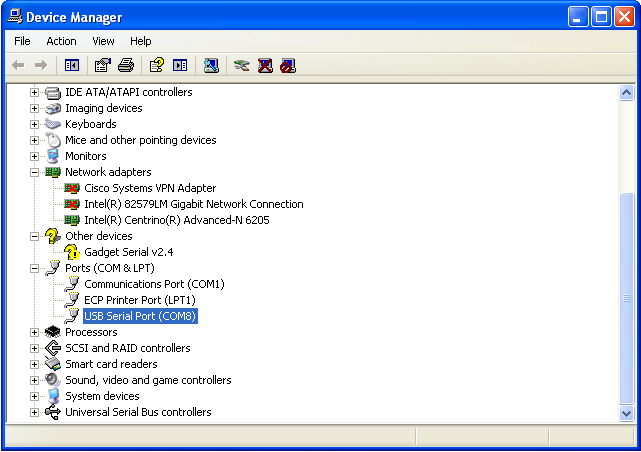
- For Microsoft Windows users: Identify the USB connection that is established,
USB Serial Port should appear in Device Manager. The COMxx number will be used to configure the terminal emulator.
- For Linux users: Identify the serial USB connection by monitoring the last lines of
dmesg command. The /dev/ttyUSBx number will be used to configure the terminal emulator.
 usb 1-1.1.2: new full-speed USB device number 17 using ehci-pci
 usb 1-1.1.2: New USB device found, idVendor=0403, idProduct=6001
 usb 1-1.1.2: New USB device strings: Mfr=1, Product=2, SerialNumber=3
 usb 1-1.1.2: Product: TTL232R-3V3
 usb 1-1.1.2: Manufacturer: FTDI
 usb 1-1.1.2: SerialNumber: FTGNVZ04
 ftdi_sio 1-1.1.2:1.0: FTDI USB Serial Device converter detected
 usb 1-1.1.2: Detected FT232RL
 usb 1-1.1.2: Number of endpoints 2
 usb 1-1.1.2: Endpoint 1 MaxPacketSize 64
 usb 1-1.1.2: Endpoint 2 MaxPacketSize 64
 usb 1-1.1.2: Setting MaxPacketSize 64
 usb 1-1.1.2: FTDI USB Serial Device converter now attached to ttyUSB0
A /dev/ttyUSB0 node has been created.
- Now open your favorite terminal emulator with appropriate settings
Demo
You need a 1 GB SD card (or more) and to download the image of the demo. The image is compressed to reduce the amount of data to download.
This image contains:
- a FAT32 partition with the AT91Bootstrap, U-Boot and the Linux Kernel (zImage and dtb).
- an EXT4 partition for the rootfs.
Multi-platform procedure
To write the compressed image on the SD card, you will have to download and install
balenaEtcher. This tool, which is an Open Source software, is useful since it allows to get a compressed image as input. More information and extra help available on the
balenaEtcher website.
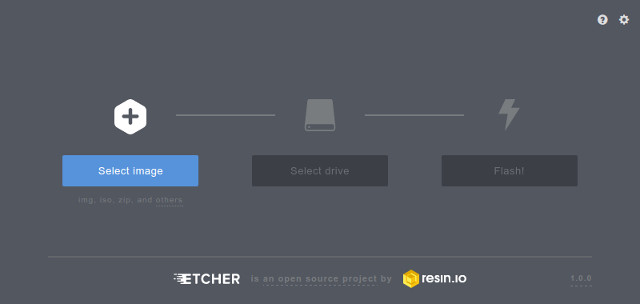
- Insert your SD card and launch
Etcher:
- Select the demo image. They are marked as "SD Card image" in the demo table above.
Note that you can select a compressed image (like the demos available here). The tool is able to decompress files on the fly
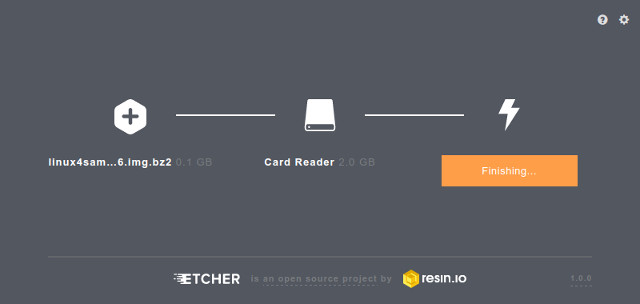
- Select the device corresponding to your SD card (Etcher proposes you the devices that are removable to avoid erasing your system disk)
- Click on the
Flash! button
- On Linux, Etcher finally asks you to enter your root password because it needs access to the hardware (your SD card reader or USB to SD card converter)
- then the flashing process begins followed by a verification phase (optional)
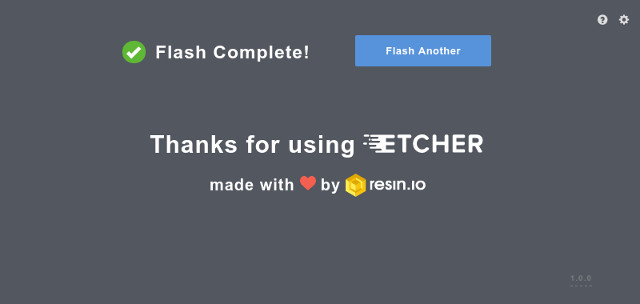
- Once writing done, Etcher asks you if you want to burn another demo image:

use SAM-BA 3.9.y onwards. You can download it here:
SAM-BA 3.9 release page.
Run script to flash the demo
- download the demo package for the board. They are marked as "Media type: NAND Flash " in the table above
- extract the demo package
- run your usual terminal emulator and enter the demo directory
- make sure that the
sam-ba application is in your Operating System path so that you can reach it from your demo package directory
- for Microsoft Windows users: Launch the
demo_linux_nandflash.bat file
- for Linux users: Launch the
demo_linux_nandflash.sh file
- this script runs SAM-BA 3 and the associated
QML sam-ba script (demo_linux_nandflash_usb.qml) with proper parameters
- when you reach the end of the flashing process (this will take a few minutes), the following line is written:
-I- === Done. ===
- connect a serial link on DBGU and open the terminal emulator program as explained just above
- power cycle the board
- monitor the system while it's booting on the LCD screen or through the serial line
Run script to boot in emulation mode
- Make sure the sd card is removed.
- Jumper J36 NAND_BOOT should be closed.
- Run the folowing script to boot the board in emulation mode.
- Microsoft users: Run
demo_linux_nandflash_emul.bat file
- Linux users: Run
demo_linux_nandflash_emul.sh file
- The script writes the boot configuration packet and the board should boot from NAND flash.
Build From source code
- Next step is to add the ARM GNU Toolchain into your system:
tar -xf arm-gnu-toolchain-13.2.rel1-x86_64-arm-none-linux-gnueabihf.tar.xz
export CROSS_COMPILE=`pwd`/arm-gnu-toolchain-13.2.rel1-x86_64-arm-none-linux-gnueabihf/bin/arm-none-linux-gnueabihf-
or
tar -xf arm-gnu-toolchain-13.2.rel1-x86_64-arm-none-linux-gnueabihf.tar.xz
export CROSS_COMPILE=arm-none-linux-gnueabihf-
export PATH=$PATH:/YOUR/PATH/TO/arm-gnu-toolchain-13.2.Rel1-x86_64-arm-none-linux-gnueabihf/bin/
This section describes how to get source code from the git repository, how to configure with the default configuration, how to customize AT91Bootstrap based on the default configuration and finally to build AT91Bootstrap to produce the binary. take the default configuration to download U-Boot from NandFlash for example.
SAM-BA tool
SAM-BA tool is required to add a header in at91bootstrap image (for both manual compilation and
through build-systems like Buildroot or Yocto Project). Download SAM-BA software with the following link:
https://github.com/atmelcorp/sam-ba/releases/tag/v3.8
Uncompress the tgz file in your workspace with:
$ tar xvzf sam-ba_v3.8-linux_x86_64
Make sure to add the sam-ba application to your $PATH and verify that you have the correct
version:
$ sam-ba -v
SAM-BA Command Line Tool v3.8
Copyright 2024 Microchip Technology
Note: this tool was tested with distribution Ubuntu 22.04 onward.
It is known to not work on Ubuntu 20.04 and previous ones, generating such kind of issues:
sam-ba: /lib64/libc.so.6: version `GLIBC_2.34' not found (required by sam-ba)
Get AT91Bootstrap Source Code
You can easily download AT91Bootstrap source code on the
at91bootstrap git repository.
To get the source code, you should clone the repository by doing:
$ git clone https://github.com/linux4sam/at91bootstrap.git
Cloning into 'at91bootstrap'...
remote: Enumerating objects: 17621, done.
remote: Counting objects: 100% (3324/3324), done.
remote: Compressing objects: 100% (1029/1029), done.
remote: Total 17621 (delta 2465), reused 3102 (delta 2285), pack-reused 14297
Receiving objects: 100% (17621/17621), 5.65 MiB | 4.65 MiB/s, done.
Resolving deltas: 100% (13459/13459), done.
$ cd at91bootstrap/
Configure AT91Bootstrap
The source code has been taken from the master branch. You
must switch to the specified tag by doing:
$ git checkout -b sama7d65 v4.0.9+sama7d65
Switched to a new branch 'sama7d65'
Assuming you are at the AT91Bootstrap root directory, you will find a
configs folder which contains several default configuration files:
sama7d65_curiosity_bkptnone_defconfig
sama7d65_curiosity-bsrnf_uboot_defconfig
sama7d65_curiosity-bsrsd1_uboot_defconfig
sama7d65_curiositydf_qspi_uboot_defconfig
sama7d65_curiositynf_uboot_defconfig
sama7d65_curiositysd1_uboot_defconfig
 Tips:
Tips: qspi means to read quad-SPI serial flash,
sd means to read sd/mmc card,
nf means to read nand flash
You can configure AT91Bootstrap to load U-Boot binary from SD Card by doing:
$ make mrproper
$ make sama7d65_curiosity-bsrsd1_uboot_defconfig
If the configuring process is successful, the .config file can be found at AT91Bootstrap root directory.
Customize AT91Bootstrap
If the default configuration doesn't meet your need, after configuring with the default configuration, you can customize it by doing:
$ make menuconfig
Now, in the menuconfig dialog, you can easily add or remove some features to/from AT91Bootstrap as the same way as kernel configuration.
Move to
<Exit> with arrows and press this button hitting the
Enter key to exit from this screen.
Build AT91Bootstrap
Then you can build the AT91Bootstrap binary by doing:
$ make
If the building process is successful, the final .bin image is
build/binaries/boot-plaintextimg.bin.
The
boot-plaintextimg.bin, is the boot format to be used for booting the sama7d65 SoC.
Warning: this
boot-plaintextimg.bin file name is different from the preceeding SoC in the Microchip MPU family, pay attention to that while re-building AT91Bootstrap.
Getting U-Boot sources
Dedicated page on U-Boot wiki:
http://www.denx.de/wiki/U-Boot/SourceCode
You can easily download U-Boot source code from
Linux4SAM GitHub U-Boot repository:
Clone the Linux4sam GitHub U-Boot repository:
$ git clone https://github.com/linux4sam/u-boot-at91.git
Cloning into 'u-boot-at91'...
remote: Enumerating objects: 1011450, done.
remote: Counting objects: 100% (111523/111523), done.
remote: Compressing objects: 100% (33355/33355), done.
remote: Total 1011450 (delta 77280), reused 111498 (delta 77272), pack-reused 899927 (from 1)
Receiving objects: 100% (1011450/1011450), 238.61 MiB | 24.92 MiB/s, done.
Resolving deltas: 100% (826270/826270), done.
Updating files: 100% (19925/19925), done.
$ cd u-boot-at91/
The source code has been taken from the
master branch. You
must switch to the specified tag by doing:
$ git checkout -b sama7d65 linux4microchip+sama7d65-2025.02
Switched to a new branch 'sama7d65'
Cross-compiling U-Boot
Before compiling the U-Boot, you need setup cross compile toolchain in the
section.
Latest versions of U-boot (2018.07 and newer) have a minimum requirement of 6.0 version of the GCC toolchain. We always recommend to use the latest versions.
Once the AT91 U-Boot sources available, cross-compile U-Boot is made in two steps: configuration and compiling. Check the
Configuration chapter in U-Boot reference manual.

Go to the
configs/ to find the exact target when invoking
make.
The U-Boot environment variables can be stored in different media, below config files can specify where to store the U-Boot environment.
   # To put environment variables in SD/MMC card:
   sama7d65_curiosity_mmc1_defconfig
Here are the building steps for the SAMA7D65-Curiosity board:
# You can change the config according to your needs.
make sama7d65_curiosity_mmc1_defconfig
make
The result of these operations is a fresh U-Boot binary called
u-boot.bin corresponding to the binary ELF file
u-boot.
-
u-boot.bin is the file you should store on the board
-
u-boot is the ELF format binary file you may use to debug U-Boot through a JTag link for instance.
Required packages
You must install essential host packages on your build host. These requirements are listed in the Linux kernel documentation with the chapter
Install build requirements. You must follow this process which includes, but not limited to, the following packages:
- build-essential
- flex
- bison
- git
- perl-base
- libssl-dev
- libncurses5-dev
- libncursesw5-dev
- ncurses-dev
Getting Kernel sources
To get the source code, you have to clone the repository:
$ git clone https://github.com/linux4sam/linux-at91.git
Cloning into 'linux-at91'...
remote: Enumerating objects: 9177564, done.
remote: Counting objects: 100% (1500/1500), done.
remote: Compressing objects: 100% (645/645), done.
remote: Total 9177564 (delta 1168), reused 1120 (delta 855), pack-reused 9176064
Receiving objects: 100% (9177564/9177564), 1.55 GiB | 10.46 MiB/s, done.
Resolving deltas: 100% (7729137/7729137), done.
Updating files: 100% (78834/78834), done.
$ cd linux-at91
The source code has been taken from the master branch. You
must switch to the specified tag by doing:
$ git checkout -b sama7d65 linux4microchip+sama7d65-2024.10
Switched to a new branch 'sama7d65'
Setup ARM Cross Compiler
- Next step is to add the ARM GNU Toolchain into your system:
tar -xf arm-gnu-toolchain-13.2.rel1-x86_64-arm-none-linux-gnueabihf.tar.xz
export CROSS_COMPILE=`pwd`/arm-gnu-toolchain-13.2.rel1-x86_64-arm-none-linux-gnueabihf/bin/arm-none-linux-gnueabihf-
or
tar -xf arm-gnu-toolchain-13.2.rel1-x86_64-arm-none-linux-gnueabihf.tar.xz
export CROSS_COMPILE=arm-none-linux-gnueabihf-
export PATH=$PATH:/YOUR/PATH/TO/arm-gnu-toolchain-13.2.Rel1-x86_64-arm-none-linux-gnueabihf/bin/
Configure and Build the Linux kernel
Now you have to configure the Linux kernel according to your hardware. We have two default configuration at91 SoC in
arch/arm/configs
arch/arm/configs/at91_dt_defconfig
arch/arm/configs/sama5_defconfig
arch/arm/configs/sama7_defconfig
-
at91_dt_defconfig: for SAM9 (ARM926) series chips
-
sama5_defconfig: for SAMA5 series chips
-
sama7_defconfig: for SAMA7 series chips
At this step, you can modify default configuration using the
menuconfig
$ make ARCH=arm menuconfig
Now, in the menuconfig dialog, you can easily add or remove some features. Once done, Move to
<Exit> with arrows and press this button hitting the
Enter key to exit from this screen.
Build the Linux kernel image, before you build you need set up the cross compile toolchain, check
this section.
$ make ARCH=arm

[..]

  Kernel: arch/arm/boot/Image is ready
  Kernel: arch/arm/boot/zImage is ready
Now you have an usable compressed kernel image
zImage.
If you need an uImage you can run this additional step:
make ARCH=arm uImage LOADADDR=0x20008000

[..]

  Kernel: arch/arm/boot/zImage is ready
  UIMAGE  arch/arm/boot/uImage
  Image Name:   Linux-6.6.23-linux4microchip-202
  Created:      Thu May 16 14:36:06 2024
  Image Type:   ARM Linux Kernel Image (uncompressed)
  Data Size:    5221704 Bytes = 5099.32 KiB = 4.98 MiB
  Load Address: 20008000
  Entry Point:  20008000
  Kernel: arch/arm/boot/uImage is ready
make ARCH=arm dtbs

[..]

  DTC     arch/arm/boot/dts/microchip/at91-sam9x60_curiosity.dtb
  DTC     arch/arm/boot/dts/microchip/at91-sam9x60ek.dtb
  DTC     arch/arm/boot/dts/microchip/at91-sam9x75_curiosity.dtb
  DTC     arch/arm/boot/dts/microchip/at91-sam9x75eb.dtb
  DTC     arch/arm/boot/dts/microchip/at91-sama5d27_som1_ek.dtb
  DTC     arch/arm/boot/dts/microchip/at91-sama5d27_wlsom1_ek.dtb
  DTC     arch/arm/boot/dts/microchip/at91-sama5d29_curiosity.dtb
  DTC     arch/arm/boot/dts/microchip/at91-sama5d2_icp.dtb
  DTC     arch/arm/boot/dts/microchip/at91-sama5d2_ptc_ek.dtb
  DTC     arch/arm/boot/dts/microchip/at91-sama5d2_xplained.dtb
  DTC     arch/arm/boot/dts/microchip/at91-sama7d65_curiosity.dtb
  DTC     arch/arm/boot/dts/microchip/at91-sama7g5ek.dtb

[..]
If the building process is successful, the final images can be found under
arch/arm/boot/ directory.
Note that building an entire distribution is a long process. It also requires a big amount of free disk space.
The support for Microchip AT91 SoC family is included in a particular Yocto Project layer:
meta-atmel. The source for this layer are hosted on
Linux4SAM GitHub account:
https://github.com/linux4sam/meta-atmel
Building environment
A step-by-step comprehensive installation is explained in the
Yocto Project Quick Build. The following lines have to be considered as an add-on that is AT91 specific or that can facilitate your setup.
Prerequisite
Here are the reference pages for setting up a Yocto Project building environment:
What You Need and How You Get It.

add
git-lfs to the package requirement list from whichever Linux distribution you use.
For instance, on Ubuntu or debian, these packages need to be installed on your development host:
sudo apt-get install gawk wget git-core git-lfs diffstat unzip texinfo gcc-multilib \
     build-essential chrpath socat cpio python3 python3-pip python3-pexpect \
     xz-utils debianutils iputils-ping python3-git python3-jinja2 libegl1-mesa libsdl1.2-dev \
     pylint3 xterm
Step by step build procedure
here is a copy of the
README procedure available directly in the
meta-atmel layer. This file in the meta-atmel layer repository must be considered as the reference and the following copy can be out-of-sync.
starting with
Linux4SAM 2021.04 release, the
meta-atmel layer supports Yocto Project templates, so make sure you create a new build environment using
oe-init-build-env
This layer provides support for Microchip microprocessors (aka AT91)
====================================================================

For more information about the Microchip MPU product line see:
http://www.microchip.com/design-centers/32-bit-mpus
Linux & Open Source on Microchip microprocessors:
http://www.linux4sam.org


Supported SoCs / MACHINE names
==============================
Note that most of the machine names below, have a SD Card variant that can be
built by adding an "-sd" suffix to the machine name.
- SAMA5D2 product family / sama5d2-xplained, sama5d2-xplained-emmc, sama5d27-som1-ek-sd, sama5d27-som1-ek-optee-sd, sama5d2-ptc-ek, sama5d2-icp, sama5d27-wlsom1-ek-sd, sama5d29-curiosity-sd
- SAMA5D4 product family / sama5d4ek, sama5d4-xplained
- SAMA5D3 product family / sama5d3xek, sama5d3-xplained
- AT91SAM9x5 product family (AT91SAM9G15, AT91SAM9G25, AT91SAM9X25, AT91SAM9G35 and AT91SAM9X35) / at91sam9x5ek
- AT91SAM9RL / at91sam9rlek
- AT91SAM9G45 / at91sam9m10g45ek
- SAM9X60 / sam9x60ek, sam9x60-curiosity
- SAMA7G5 / sama7g5ek-sd, sama7g5ek-optee-sd, sama7g5ek-emmc, sama7g5ek-ospi
- SAMA7D65 / sama7d65-curiosity
- SAM9X75 / sam9x75eb, sam9x75-curiosity

Sources
=======
- meta-atmel
URI: https://github.com/linux4sam/meta-atmel.git
Branch: scarthgap
Tag/commit:linux4microchip+sama7d65-2025.02

Dependencies
============
This Layer depends on :
- poky
URI: https://git.yoctoproject.org/poky
Branch: scarthgap
Tag:scarthgap-5.0.3

- meta-openembedded
URI: https://git.openembedded.org/meta-openembedded
Branch: scarthgap
Tag/commit:735ae0310870ffce07ce0c55c4f87c20ac161ff9

- meta-arm (for optee components)
URI: https://git.yoctoproject.org/meta-arm
Branch: scarthgap
Tag:yocto-5.0

Build procedure
===============

0/ Create a directory
mkdir my_dir
cd my_dir

1/ Clone yocto/poky git repository with the proper branch ready
git clone https://git.yoctoproject.org/poky && cd poky && \
git checkout -b scarthgap scarthgap-5.0.3 && cd -

2/ Clone meta-openembedded git repository with the proper branch ready
git clone git://git.openembedded.org/meta-openembedded && \
cd meta-openembedded && git checkout -b scarthgap 735ae0 && cd -

3/ Clone meta-atmel layer with the proper branch ready
git clone https://github.com/linux4sam/meta-atmel.git && cd meta-atmel && \
git checkout linux4microchip+sama7d65-2025.02 && cd -

4/ Clone meta-arm layer with the proper branch ready
git clone https://git.yoctoproject.org/meta-arm && cd meta-arm && \
git checkout -b scarthgap yocto-5.0 && cd -

5/ Enter the poky directory to configure the build system and start the build process
cd poky
If not created yet, add a new "build-microchip" directory:
mkdir build-microchip
Else, if it's the first time you use Yocto Project templates, and if the
build-microchip directory remains from a previous use, we advise you to start
from a fresh directory. Keep your build-microchip/conf/local.conf file for
reference.

6/ Inside the .templateconf file, you will need to modify the TEMPLATECONF
variable to match the path to the meta-atmel layer "conf" directory:
export TEMPLATECONF=${TEMPLATECONF:-../meta-atmel/conf/templates/default}

7/ Initialize build directory
source oe-init-build-env build-microchip

8/ To build a small image provided by Yocto Project:
[MACHINE=] bitbake core-image-minimal

Example for sama5d2-xplained-sd SD card image:
MACHINE=sama5d2-xplained-sd bitbake core-image-minimal

9/ To build the microchip image with no graphics support:
[MACHINE=] bitbake microchip-headless-image

Example for sama5d2-xplained-sd SD card image:
MACHINE=sama5d2-xplained-sd bitbake microchip-headless-image

10/ To build the microchip image with graphics support (EGT):
[MACHINE=] bitbake microchip-graphics-image

Example for sama5d2-xplained-sd SD card image:
MACHINE=sama5d2-xplained-sd bitbake microchip-graphics-image

Typical bitbake output
======================
Build Configuration:
BB_VERSION           = "2.8.0"
BUILD_SYS            = "x86_64-linux"
NATIVELSBSTRING      = "universal"
TARGET_SYS           = "arm-poky-linux-gnueabi"
MACHINE              = "sam9x75-curiosity-sd"
DISTRO               = "poky-atmel"
DISTRO_VERSION       = "5.0.3"
TUNE_FEATURES        = "arm armv5 thumb dsp"
TARGET_FPU           = "soft"
meta
meta-poky
meta-yocto-bsp       = "heads/scarthgap-5.0.3:0b37512fb4b231cc106768e2a7328431009b3b70"
meta-oe
meta-networking
meta-webserver
meta-python
meta-initramfs       = "735ae0310870ffce07ce0c55c4f87c20ac161ff9:735ae0310870ffce07ce0c55c4f87c20ac161ff9"
meta-atmel           = "heads/linux4microchip-2024.10:53c6bb2eddceb62ae5120c7c68174ce423d341e2"
meta-multimedia      = "735ae0310870ffce07ce0c55c4f87c20ac161ff9:735ae0310870ffce07ce0c55c4f87c20ac161ff9"
meta-arm
meta-arm-toolchain   = "heads/yocto-5.0:8aa8a1f17f5b64bc691544f989f04fc83df98adb"

Contributing
============
To contribute to this layer you should submit the patches for review to:
the github pull-request facility directly or the forum. Anyway, don't forget to
Cc the maintainers.

Microchip Forum:
https://www.microchip.com/forums/f542.aspx

for some useful guidelines to be followed when submitting patches:
http://www.openembedded.org/wiki/How_to_submit_a_patch_to_OpenEmbedded

Maintainers:
Hari Prasath G E
Nicolas Ferre

When creating patches insert the [meta-atmel] tag in the subject, for example
use something like:
git format-patch -s --subject-prefix='meta-atmel][PATCH'
Prerequisites
Host build system should be a Linux system with necessary software installed:
http://buildroot.uclibc.org/downloads/manual/manual.html#requirement
Note You can install missing packages using yum install with Fedora or apt install with Ubuntu or Debian. These commands may require root privileges or being in a correct sudoers group.
Get sources
To get the source code, you have to clone the buildroot-mchp and buildroot-external-microchip repositories. buildroot-mchp is a fork of Buildroot with a minimal number of patches. The external tree provides changes which will not hit the mainline:
additional defconfigs files and packages dedicated to our demos.
$ git clone https://github.com/linux4microchip/buildroot-mchp.git -b 2024.02-mchp
Cloning into 'buildroot-at91'...
remote: Enumerating objects: 463728, done.
remote: Counting objects: 100% (83926/83926), done.
remote: Compressing objects: 100% (30247/30247), done.
remote: Total 463728 (delta 53436), reused 83881 (delta 53426), pack-reused 379802
Receiving objects: 100% (463728/463728), 102.44 MiB | 10.50 MiB/s, done.
Resolving deltas: 100% (313672/313672), done.

$ ls buildroot-mchp/
arch board boot CHANGES Config.in Config.in.legacy configs COPYING DEVELOPERS docs
fs linux Makefile Makefile.legacy package README support system toolchain utils

$ git clone https://github.com/linux4sam/buildroot-external-microchip.git
Cloning into 'buildroot-external-microchip'...
remote: Enumerating objects: 7753, done.
remote: Counting objects: 100% (7753/7753), done.
remote: Compressing objects: 100% (1634/1634), done.
remote: Total 7753 (delta 5882), reused 7715 (delta 5844), pack-reused 0
Receiving objects: 100% (7753/7753), 1.07 MiB | 5.91 MiB/s, done.
Resolving deltas: 100% (5882/5882), done.

$ ls buildroot-external-microchip/
board Config.in configs COPYING
README.md system
docs
external.desc
external.mk
package
patches

$ ls -1 buildroot-external-microchip/configs/sama7d65_curiosity*
configs/sama7d65_curiosity_graphics_defconfig
configs/sama7d65_curiosity_headless_defconfig
Build the rootfs image
To build the the rootfs image that we provide for sama7d65 curiosity, you will have to execute from the directory where you cloned the required repository:
$ cd buildroot-mchp
$ BR2_EXTERNAL=../buildroot-external-microchip/ make sama7d65_curiosity_graphics_defconfig
$ make
Once compilation is done, have a look to output/images directory to see what has been generated:
$ ls -1 output/images/
at91bootstrap.bin
at91-sama7d65_curiosity.dtb
boot.bin
boot-plaintextimg.bin
boot.vfat
rootfs.ext2
rootfs.ext4
rootfs.tar
sama7d65_curiosity_at25ff321a_click1.dtbo
sama7d65_curiosity.itb
sama7d65_curiosity.its
sama7d65_curiosity_lvds.dtbo
sama7d65_curiosity_mipi.dtbo
sama7d65_curiosity_pwm.dtbo
sama7d65_curiosity_tcb_pwm.dtbo
sama7d65-sdcardboot-uboot-4.0.7.bin
sama7d65-sdcardboot-uboot-4.0.7-sama7d65-ea.bin
sama7d65-sdcardboot-uboot-4.0.7-sama7d65-ea-plaintextimg.bin
sdcard.img
u-boot.bin
uboot-env.bin
zImage
All software components are there: booloaders, kernel, device tree and rootfs. The SD Card image ready to be flashed:
sdcard.img
: If you do a
make clean, you will delete the rootfs but also the cross toolchain, redoing the whole process again will take time.
Recent FAQ
- Sama7d65Curiosity
-
• Sama 7 d 65 Curiosity Buildroot BSR: SAMA7D65 ready-made Buildroot images & BSR. (AT91Bootstrap, BuildRoot)
• Using Atmel DRMDriver: Using Atmel KMS/DRM LCD driver. (Kernel, linux-3.18-at91, linux-4.1-at91, linux-4.4-at91, linux-4.9-at91, linux-4.14-at91, linux-4.19-at91, linux-5.4-at91, linux-5.10-at91, linux-5.15-mchp, linux-6.1-mchp, linux-6.6-mchp)
• U-Boot FAQ: Some U-Boot FAQ entries. (U-Boot)
• Using FITwith Overlays: How to use U-boot with FIT image to load overlays. (U-Boot, Kernel)
• Patching DTin Uboot: How to apply DTBOs in U-boot. (U-Boot, Kernel)
• Using Systemd: Basic systemd user guide. (linux-6.1-mchp, linux-6.6-mchp, BuildRoot, YoctoProject)
• Thermal Faq: Thermal management support on SAMA7G5. (Kernel, linux-5.15-mchp, linux-6.1-mchp, linux-6.6-mchp)
• Using SAMA 5 D 2 ADCDevice: Using the SAMA5D2-compatible ADC device. (Kernel, linux-5.15-mchp, linux-6.1-mchp, linux-6.6-mchp)